Responding to an Opportunity
Once you have reviewed an opportunity and have joined your company's response team, you can create a response to an opportunity. When you respond to an opportunity, a record of your response is stored in the system.

Note
The steps described below assume that you have already reviewed the opportunities available via the All Opportunities page. For more information about the All Opportunities page, jump to Managing Response Team Tasks.
A response comprises several components, including:
- Completing the Response's Cover Page
- Adding Pricing Information to a Response
- Adding Attachments to a Response
- Adding Cost-Sensitive Attachments to a Response
- Completing a Requirements Checklist
- Reviewing Terms and Conditions
- Viewing a Response's Summary
- Submitting a Response
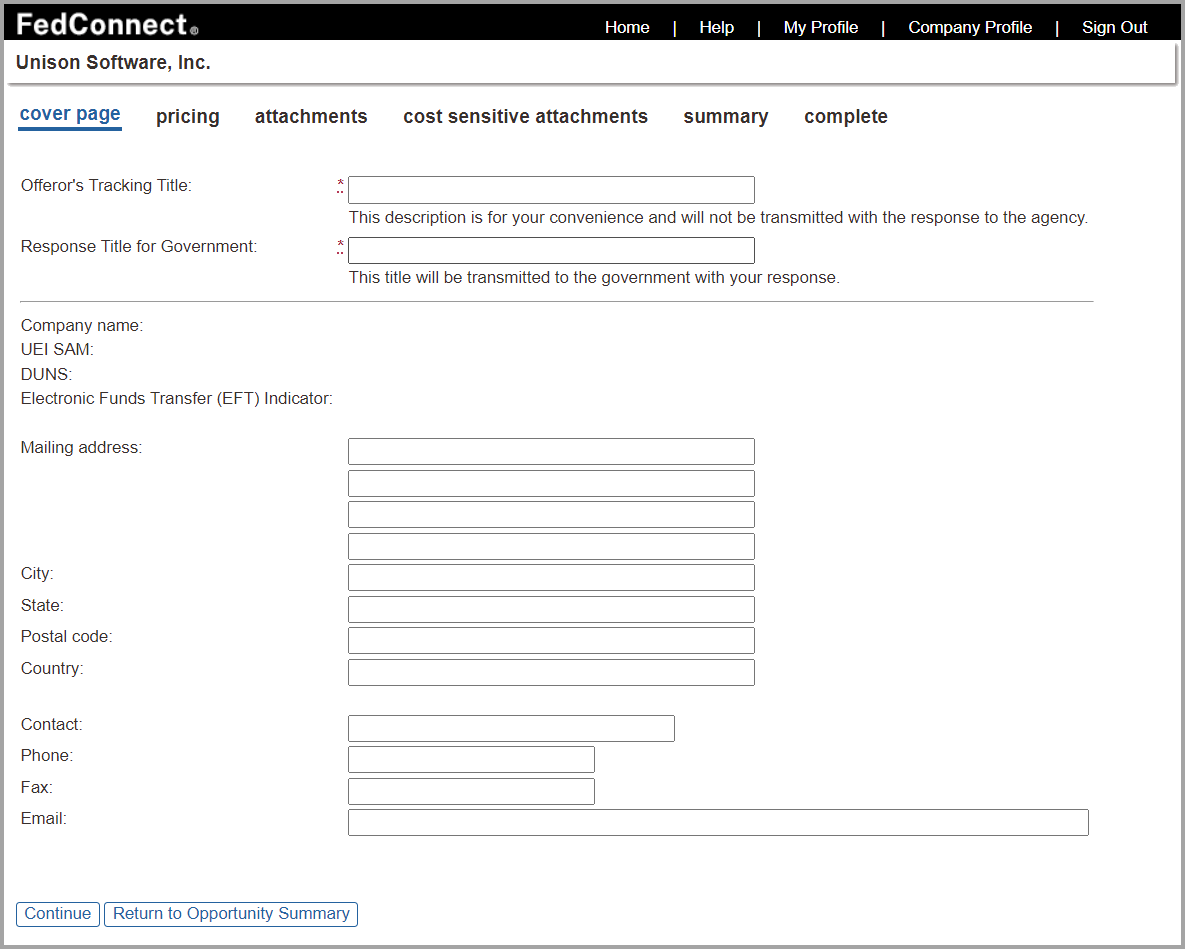
Completing the Response's Cover Page
Your response's cover page includes general information about your response and your company, such as your company's name, UEI SAM number, DUNS number, mailing address, and point of contact.
Note
The DUNS was deprecated for use by the federal government as of April 4, 2022 in favor of the new non-proprietary UEI SAM value.

Navigation
Sign in to FedConnect | My Opportunities | click the opportunity's link in the Title column | click Add Response in the Responses section (or click a link in the Description column if you want to edit an existing response)
The following picture illustrates how the Cover Page page might look. Your results might vary.
| Field | Description |
|---|---|
|
Description |
In the Description field, type a description of the response. This description will only be seen by members of the response team; no one at the opportunity's agency will see it. |
|
Company Name |
In the Company name field, your company's name displays. |
|
UEI SAM |
In the UEI SAM field, your company's Unique Entity Identifier (UEI), which is used by the System for Award Management (SAM) displays. |
|
DUNS |
In the DUNS field, your company's Dun & Bradstreet Universal Numbering System number displays. The DUNS was deprecated for use by the federal government as of April 4, 2022 in favor of the new non-proprietary UEI SAM value. |
|
Mailing Address City State Postal Code Country |
In the Mailing address, City, State, Postal code, and Country fields, type your company's full mailing address, city, state, ZIP code, and country, respectively. |
| Contact | In the Contact field, type the name of the person at your company who is the point of contact for the response. |
| Phone | In the Phone field, type the phone number that should be considered the main contact phone number for the response. |
| Fax | In the Fax field, type the fax number that should be considered the main contact fax number for the response. |
|
In the Email field, type the email address that should be considered the main contact email address for the response.
Important The system permits email domain extensions longer than three characters. It also permits apostrophes in an email address, provided the apostrophe is placed BEFORE the @ symbol. |

Important
When you submit a response to a Broad Agency Announcement (BAA) solicitation (a.k.a. "opportunity") in FedConnect, a cover page is required. This response is likely a white paper. When you send a white paper via FedConnect to an agency, it is assigned a tracking number if it is a new response. This enables the agency to differentiate between responses as each one will have a unique identification number.
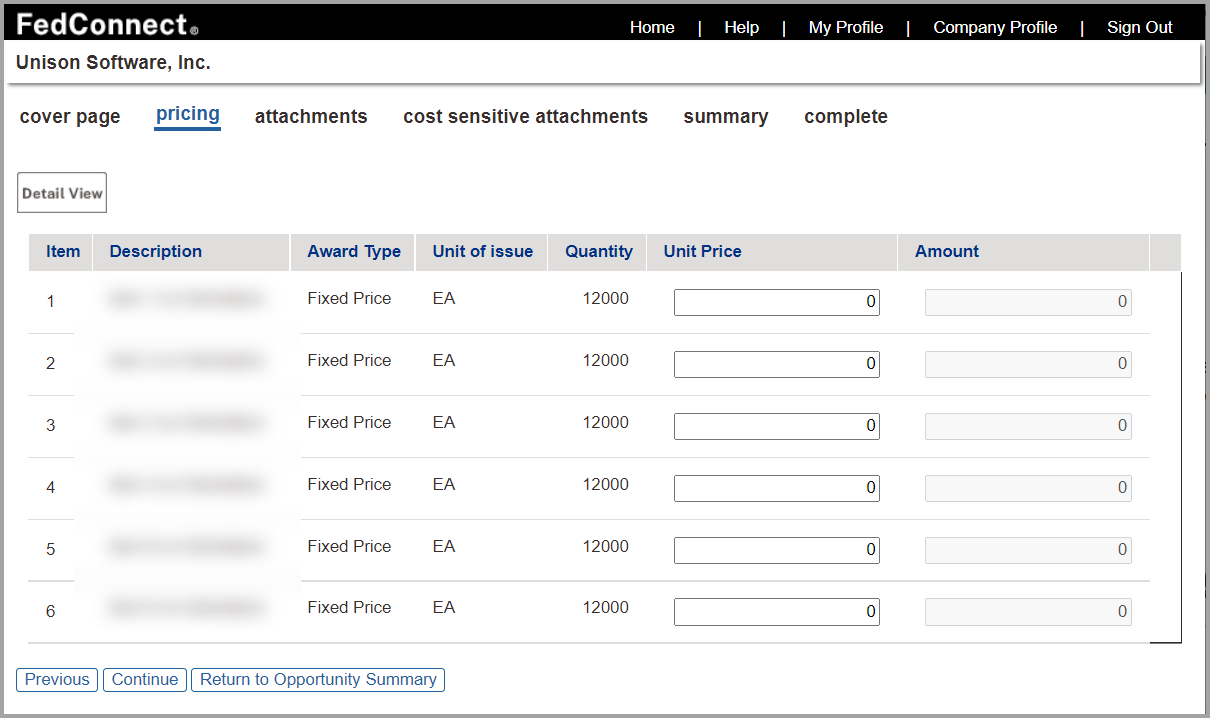
Adding Pricing Information to a Response
For each of the line items in a response, you can add separate pricing information to help agency personnel understand the complete breakdown of pricing in a response.
The Pricing page also includes a toggle button labeled Detail View. When you click Detail View, FedConnect refreshes the Pricing page to display information for one line item at a time. This gives you the flexibility to look at and update the entire list of line items, or be more focused and work on only one line item at a time.
Navigation
Sign in to FedConnect | My Opportunities | click the opportunity's link in the Title column | click Add Response in the Responses section (or click a link in the Description column if you want to edit an existing response) | click Pricing
The following picture illustrates how the Pricing page might look when you use it to see the list of line items in a response (the table on the Pricing page that displays the list of line items is colloquially called a "grid"). Your results might vary.
The following picture illustrates how the Pricing page might look after you click Detail View and refresh the Pricing page to see details for only one line item. Your results might vary.

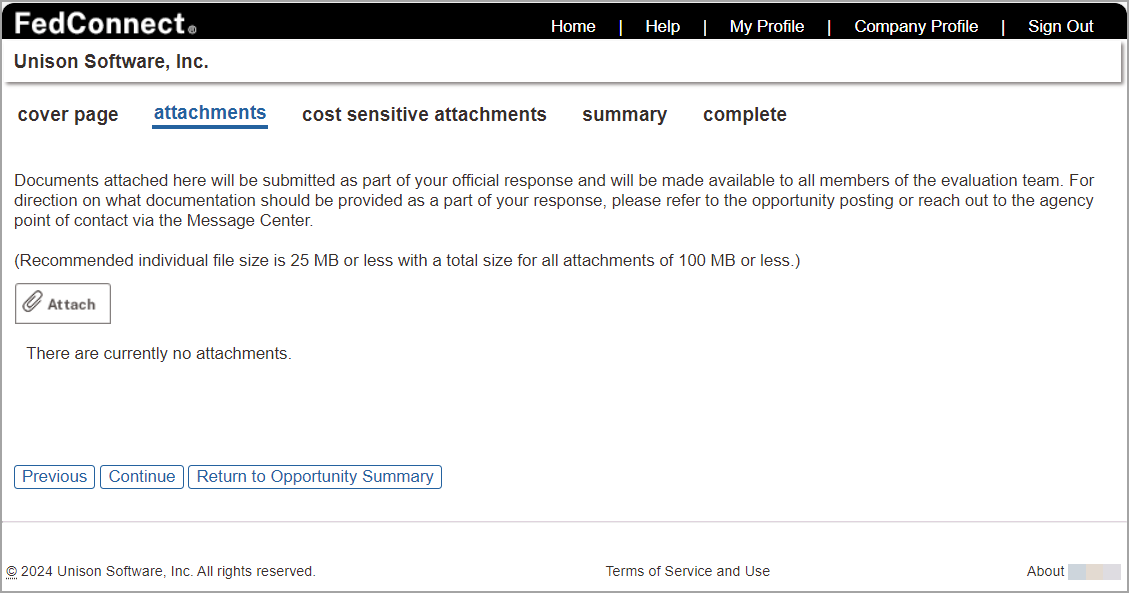
Adding Attachments to a Response
You can add attachments to your response that will be submitted as part of the response to the opportunity's issuing agency, and that can be opened and/or downloaded by members of the response evaluation team. You use the Attachments page for responses to add attachments to a response.
Note
The recommended individual file size for attachments is 100 MB or less with a total size for all attachments included in a response of 2 GB or less.
Navigation
Sign in to FedConnect | My Opportunities | click the opportunity's link in the Title column | click Add Response in the Responses section (or click a link in the Description column if you want to edit an existing response) | Attachments
The following picture illustrates how the Attachments page might look. Your results might vary.
| Column | Description |
|---|---|
|
Title |
Displays the title of the attachment as it was recorded in the Title field on the Attachment Details page. |
|
File Name |
Displays the attachment's file name, as it was recorded in the File Name field on the Attachment Details page. To view an attachment, click its link in the File Name column. Follow your browser's file download prompts to open the attachment, or save it to your computer. |
|
[Details] |
Displays a link labeled "Details." To view details about your attachment, click Details. The Attachment Details page displays. |
|
[Delete] |
To delete an attachment, click X. At the, "Are you sure you want to delete this record?" prompt, click OK. |
Navigation
Sign in to FedConnect | My Opportunities | click the opportunity's link in the Title column | click Add Response in the Responses section (or click a link in the Description column if you want to edit an existing response) | Attachments | Attach File
The following picture illustrates how the Attachment Details page might look when Uploaded File is selected in the Attachment Method field. Your results might vary.
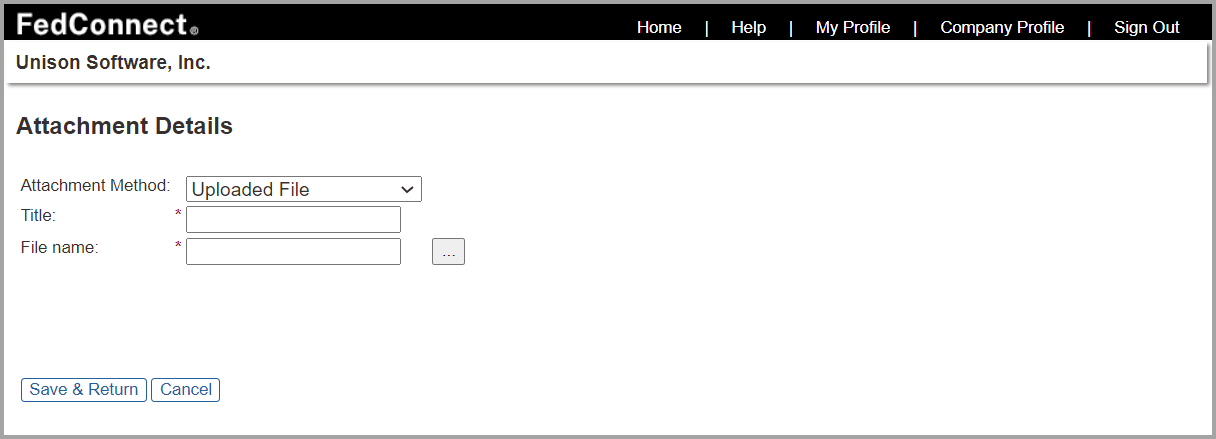
The following picture illustrates how the Attachment Details page might look when Uploaded File is selected in the Attachment Method field. Your results might vary.

| Field | Description |
|---|---|
|
Attachment Method |
In the Attachment Method field, you can select a value that best represents the kind of attachment you are adding to the opportunity.
|
|
Title |
In the Title field, type a title for your attachment. This field applies to both attachment methods. |
|
File Name |
In the File Name field, click the lookup button (...). The Attachment - Upload File page displays. Browse to the file you want to attach, then click Upload. The system uploads the file and its name displays in the File Name field. This field applies only to the Uploaded File attachment method. |
|
Document Link |
In the Document Link field, type the URL for the external file you want to attach to the opportunity. The Document Link field displays only if you select External Document Link in the Attachment Method field. |
| Created By |
The Created By field displays the name of the person who originally uploaded the file. This field displays only when you view details about an attachment. It does not display when you are adding an attachment. |
| Last Updated |
The Last Updated field displays the name of the person who most recently updated the file. This field displays only when you view details about an attachment. It does not display when you are adding an attachment. |
Adding Cost-Sensitive Attachments to a Response
Note
The recommended individual file size for attachments is 100 MB or less with a total size for all attachments included in a response of 2 GB or less.
You can add cost-sensitive attachments to your response that will be submitted as part of the response to the opportunity's issuing agency, but that can only be viewed by members of the response cost proposal evaluation team. When cost-sensitive attachments have been added, they display in a list on the Cost Sensitive Attachments page.
Navigation
Sign in to FedConnect | My Opportunities | click the opportunity's link in the Title column | click Add Response in the Responses section (or click a link in the Description column if you want to edit an existing response) | Cost Sensitive Attachments
The following picture illustrates how the Cost Sensitive Attachments page might look. Your results might vary.
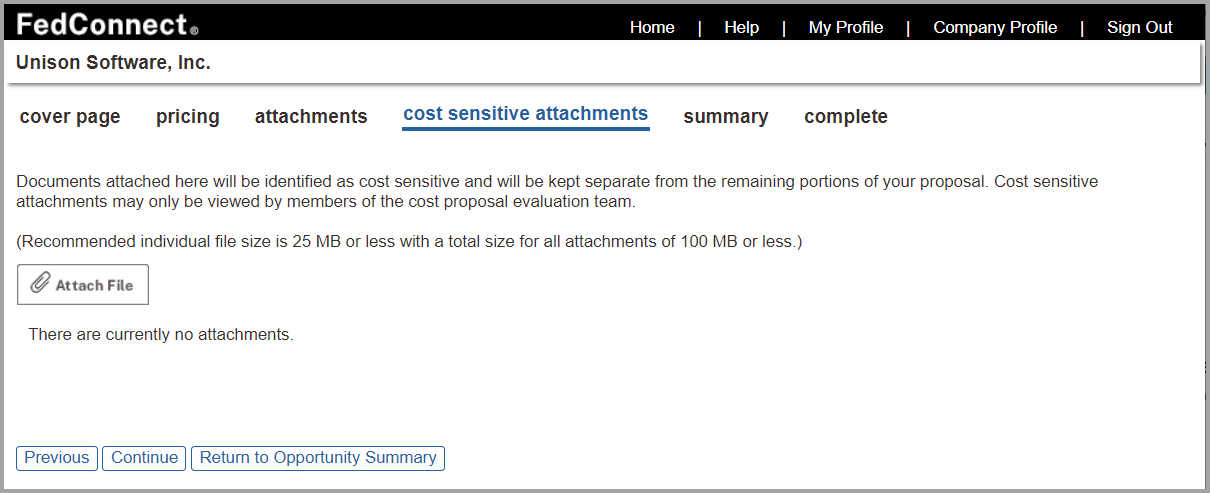
| Column | Description |
|---|---|
|
Title |
Displays the title of the cost sensitive attachment as it was recorded in the Title field on the Cost Sensitive Attachment Details page, for each cost-sensitive attachment in the list. |
|
File Name |
Displays the attachment's file name, as it was recorded in the File Name field on the Cost Sensitive Attachment Details page, for each cost-sensitive attachment in the list. To view an attachment, click its link in the File Name column. Follow your browser's file download prompts to open the attachment, or save it to your computer. |
|
[Details] |
Displays a link labeled "Details." To view details about your attachment, click Details. The Cost Sensitive Attachment Details page displays. |
|
[Delete] |
To delete an attachment, click X. At the, "Are you sure you want to delete this record?" prompt, click OK. |
Navigation
Sign in to FedConnect | My Opportunities | click the opportunity's link in the Title column | click Add Response in the Responses section (or click a link in the Description column if you want to edit an existing response) | Cost Sensitive Attachments | Attach File
The following picture illustrates how the Cost Sensitive Attachment Details page might look. Your results might vary.
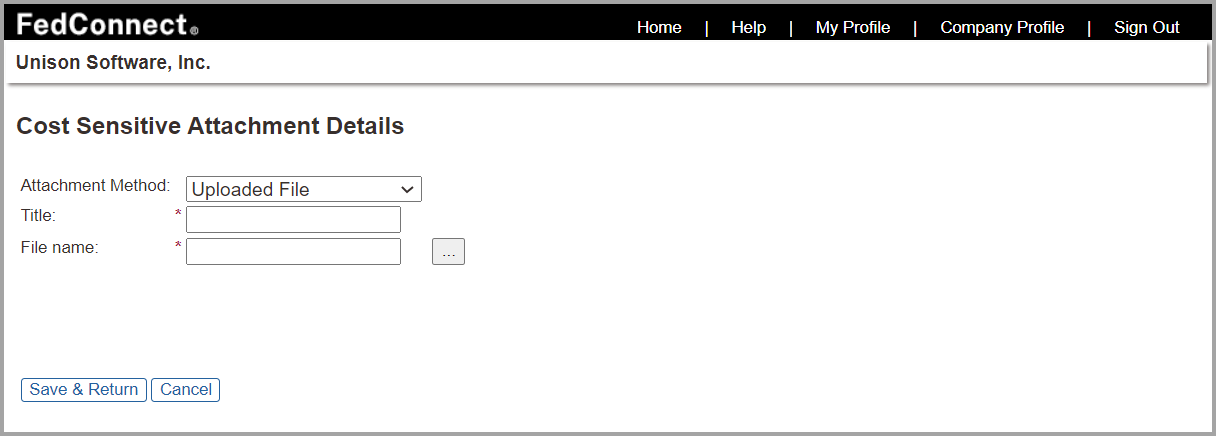
Note
A read-only version of the Cost Sensitive Attachment Details page displays when you click the Details link in the [Details] column on the Cost Sensitive Attachments page. The descriptions of the fields below are for the read/write version that displays when you are adding a cost-sensitive attachment.
| Field | Description |
|---|---|
|
Attachment Method |
In the Attachment Method field, you can select a value that best represents the kind of attachment you are adding to the opportunity.
|
|
Title |
In the Title field, type a title for your attachment. This field applies to both attachment methods. |
|
File Name |
In the File Name field, click the lookup button (...). The Attachment - Upload File page displays. Browse to the file you want to attach, then click Upload. The system uploads the file and its name displays in the File Name field. This field applies only to the Uploaded File attachment method. |
|
Document Link |
In the Document Link field, type the URL for the external file you want to attach to the opportunity. The Document Link field displays only if you select External Document Link in the Attachment Method field. |
| Created By |
The Created By field displays the name of the person who originally uploaded the file. This field displays only when you view details about a cost sensitive attachment. It does not display when you are adding a cost sensitive attachment. |
| Last Updated |
The Last Updated field displays the name of the person who most recently updated the file. This field displays only when you view details about an attachment. It does not display when you are adding a cost sensitive attachment. |
Completing a Requirements Checklist
Some agency opportunity postings might include a requirements checklist. These requirements checklists are created in the agency's procurement system. The checklists are then transmitted from the agency's procurement system to FedConnect when an opportunity is released and subsequently posted to FedConnect.
In FedConnect, a requirements checklist provides a way for an agency to ensure that vendors and applicants have included all of the necessary elements in submitting a proposal. From the vendor or applicant's perspective, a requirements checklist in an opportunity serves as a compliance and completeness check for the vendor or applicant's proposal in FedConnect. The checklist helps vendors and applicants ensure that they have submitted all required documents, certifications, and responses in accordance with the opportunity's requirements. Using a checklist can also help vendors avoid rejection due to missing documents.
Navigation
Sign in to FedConnect | My Opportunities | click the opportunity's link in the Title column | click Add Response in the Responses section (or click a link in the Description column if you want to edit an existing response) | Requirements Checklist
The following picture illustrates how the Requirements Checklist page might look. Your results might vary.
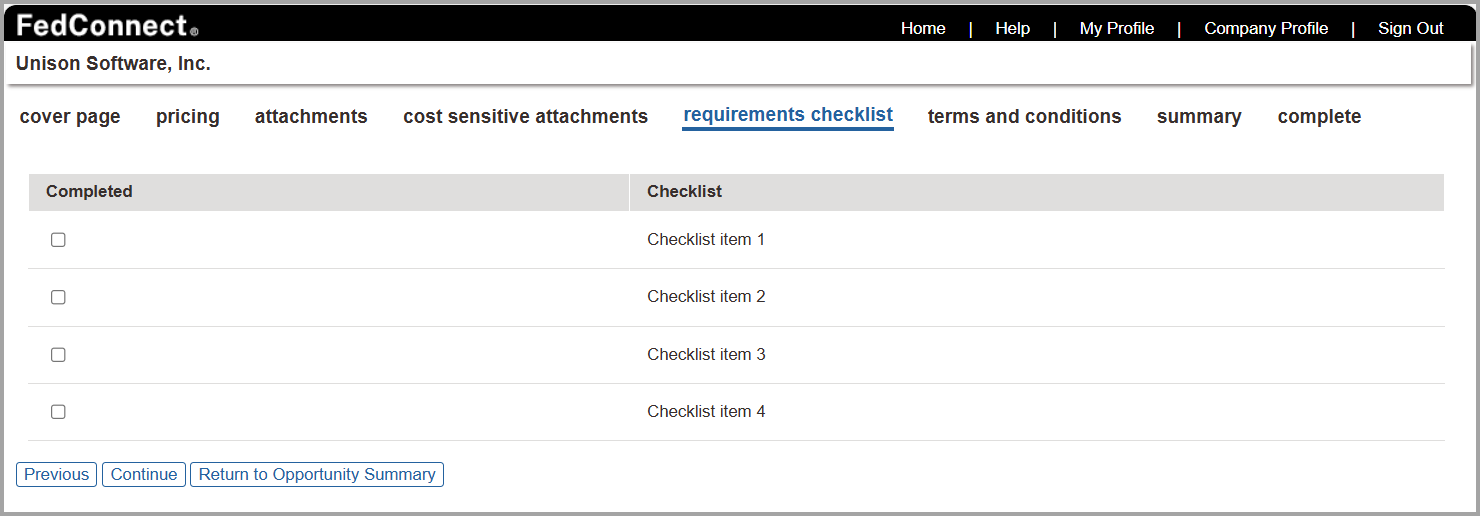
There are two columns on the Requirements Checklist page:
-
The Completed column
-
The Checklist column
Use the Completed column to select the check boxes for each item in the checklist that you have completed; this information is transmitted to the agency's procurement system when you submit the proposal to the agency via FedConnect. When you select a check box in the Completed column for a requirement in the list and then submit that information to the agency, you are confirming that you have indeed met that requirement.
Use the Checklist column to read the list of requirements in the agency's checklist for any given opportunity. These checklist requirements describe the action or actions that the agency expects you to take before you select the check box for each requirement to indicate that you have completed a required action.
The following is an example of checklist items that might be included in a requirements checklist, in any combination of the following components*:
-
Administrative and submission requirements—such as the correct format for the submission, required labeling, a required form, UEI SAM information, and/or acknowledgment of amendments
-
Technical proposal requirements—such as a statement of work (SOW), resumes for personnel, past performance references, certifications, and security agreements
-
Pricing proposal requirements—such as the required format for the pricing (in a spreadsheet, a form, CLIN structure, etc.), detailed cost breakdown (labor categories, hours, materials, etc.), a basis of estimate (BOE), signed representations and certifications (reps and certs), and subcontracting plans
-
Legal and compliance certifications—such as (and where applicable) certification for the Buy American Act or the Davis-Bacon Act, an organizational conflict of interest (OCI) statement, an equal opportunity (EEO) compliance form, affirmation of compliance with cyber security requirements
-
Additional attachments and supporting documents—such as proof of financial viability, proof of compliance with required coverage levels of insurance, and risk mitigation plans
* This is not an exhaustive list of what to expect. Other requirements exist that are not listed here. This example list is meant only for illustrative purposes, to give a general idea or feel for what you might see in a requirements checklist.
Reviewing Terms and Conditions
Some agencies allow or require a vendor to review the list of clauses associated with an opportunity and to mark any clauses as exceptions, where applicable. In FedConnect this is accomplished via the Terms and Conditions page. The Terms and Conditions page displays a list of the clauses that the agency added to an opportunity and then transmitted to FedConnect upon posting the opportunity. The clauses are listed on the page in ascending numerical order. When a response is still in progress, you can edit the values on the Terms and Conditions page. After you have submitted a response, the Terms and Conditions page becomes read-only and cannot be edited.
Navigation
Sign in to FedConnect | My Opportunities | click the opportunity's link in the Title column | click Add Response in the Responses section (or click a link in the Description column if you want to edit an existing response) | Terms and Conditions
The following picture illustrates how the Terms and Conditions page might look. Your results might vary.
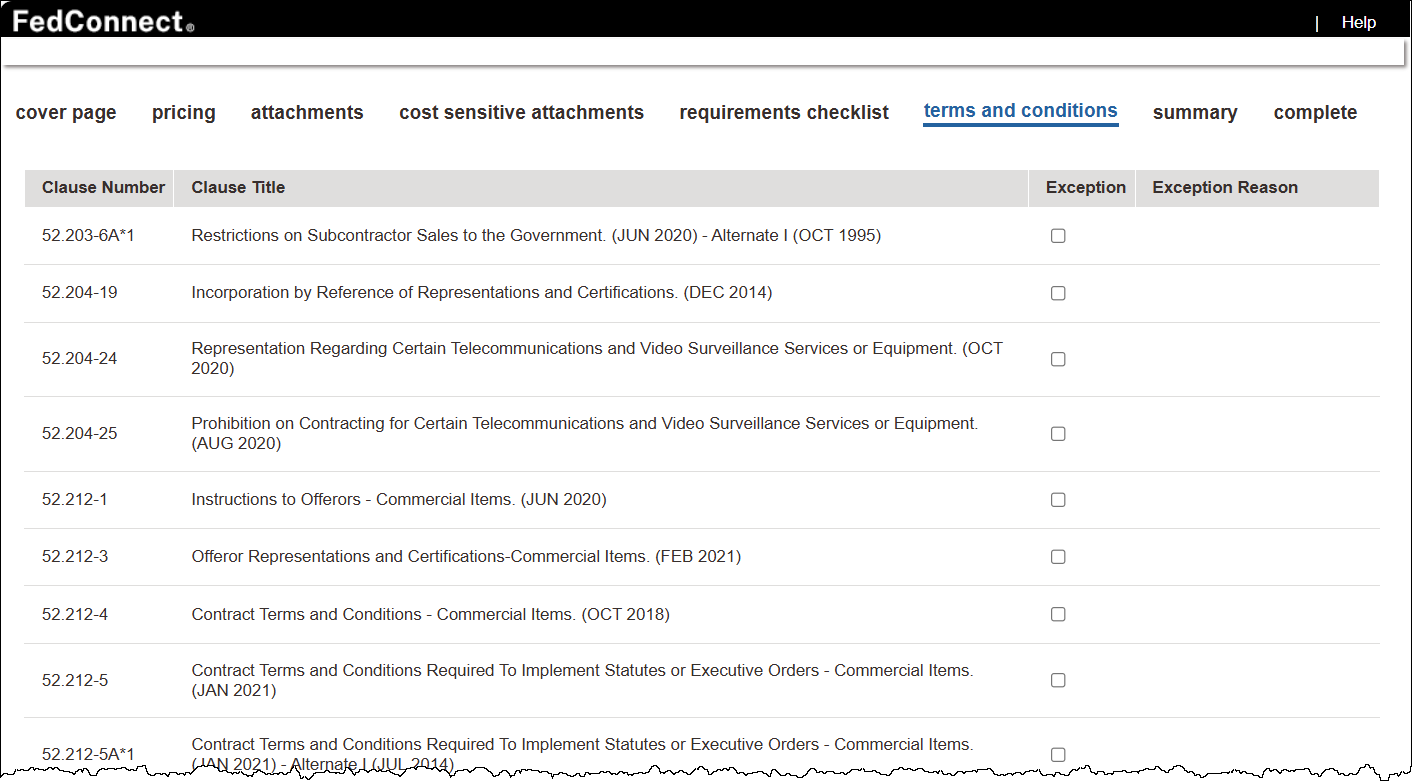
There are four columns on the Terms and Conditions page:
-
The Clause Number column
-
The Clause Title column
-
The Exception column
-
The Exception Reason column
The information that displays in the Clause Number and Clause Title columns comes directly from the agency's clause database. These are the numbers and descriptions assigned by the regulatory body that governs the specific clause database of origin for the clauses associated with an opportunity. In the event that a clause number has alternates, it displays in the list with a capital letter A at the end of the number, followed by an asterisk and the number of the alternate. So if the main clause is 52.216-26 then the first alternate for it will display in FedConnect as 52.216-7A*1.
To indicate that you have a conflict or some other issue with a clause in the list, select its check box in the Exception column. When you do so, the Exception Reason column for that row becomes editable and a text box field displays. You are required to make an entry in the Exception Reason column for a clause if you select its associated check box in the Exception column. You can type up to 250 characters in the text box, to provide a brief description for the primary reason for the exception. This in part can provide clarification on how clause exceptions might impact your proposal.
Note
A few details to keep in mind when you are working with clause exceptions in terms and conditions:
-
FedConnect saves your work when you click Continue or you navigate away from the Terms and Conditions page
-
FedConnect automatically clears the value in the Exception Reason column for you if you If you clear the check box in the Exception column for a clause. Use caution with this as there is no "are you sure" pop-up window to prevent you from mistakenly deleting an exception reason that you have already written.
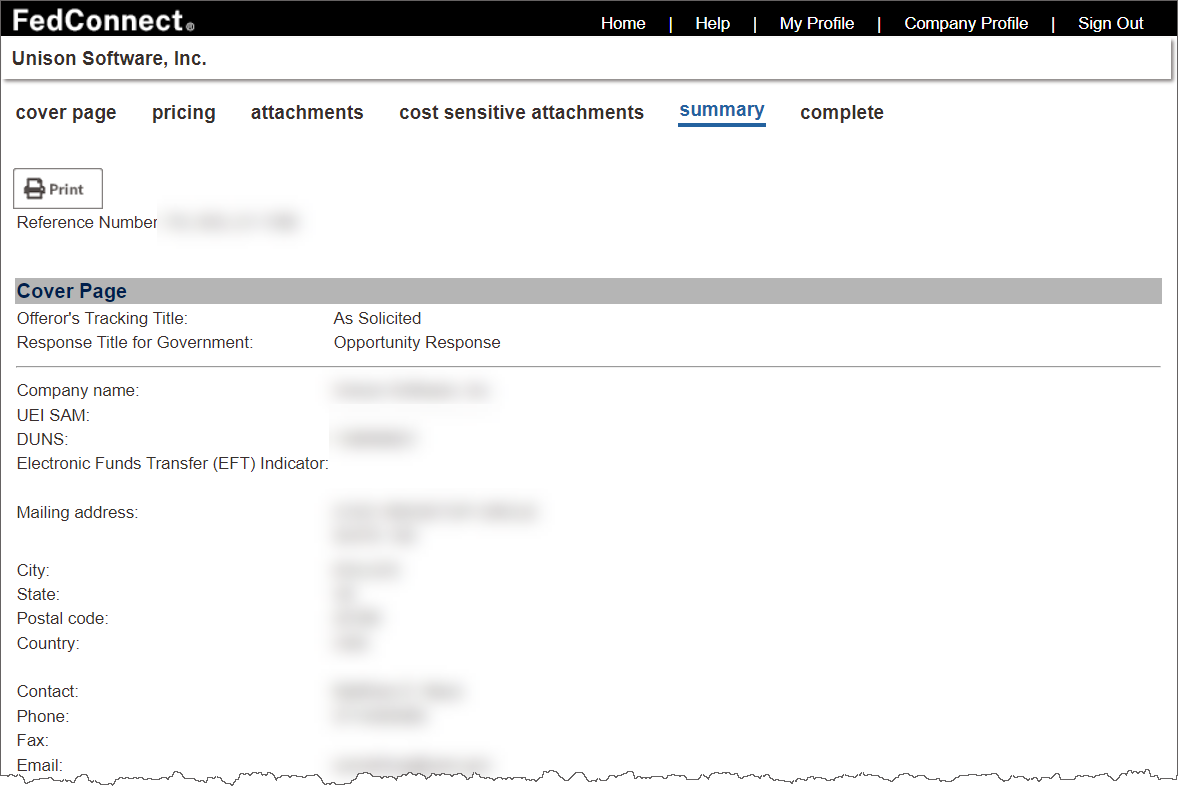
Viewing a Response's Summary
You can view a summary of your response before submitting it to the opportunity's issuing agency. Most of the information on the Response Summary page is read-only, although you can open the attachments cited on the page.
The summary includes lists of the following:
-
Contact information
-
Line items
-
Option line items
-
Attachments
-
Cost-sensitive attachments
-
Completion information (when applicable)
Note
You can print a copy of the Response Summary page:
Just click the Print button ( ).
).
Navigation
Sign in to FedConnect | My Opportunities | click the opportunity's link in the Title column | click Add Response in the Responses section (or click a link in the Description column if you want to edit an existing response) | Summary
The following picture illustrates how the Summary page might look. Your results might vary.
Note
To edit any of the information that displays on the Summary page, click the link associated with that information.
For example, if you want to edit a field that displays in the Cover Page section of the Summary page, click the Cover Page tab. The Cover Page page displays; you can edit the information on that page.
Submitting a Response
The final step in responding to an opportunity is to submit your response to the opportunity's issuing agency.
Navigation
Sign in to FedConnect | My Opportunities | click the opportunity's link in the Title column | click Add Response in the Responses section (or click a link in the Description column if you want to edit an existing response) | complete the steps described above | Complete
The following picture illustrates how the Complete page might look. Your results might vary.
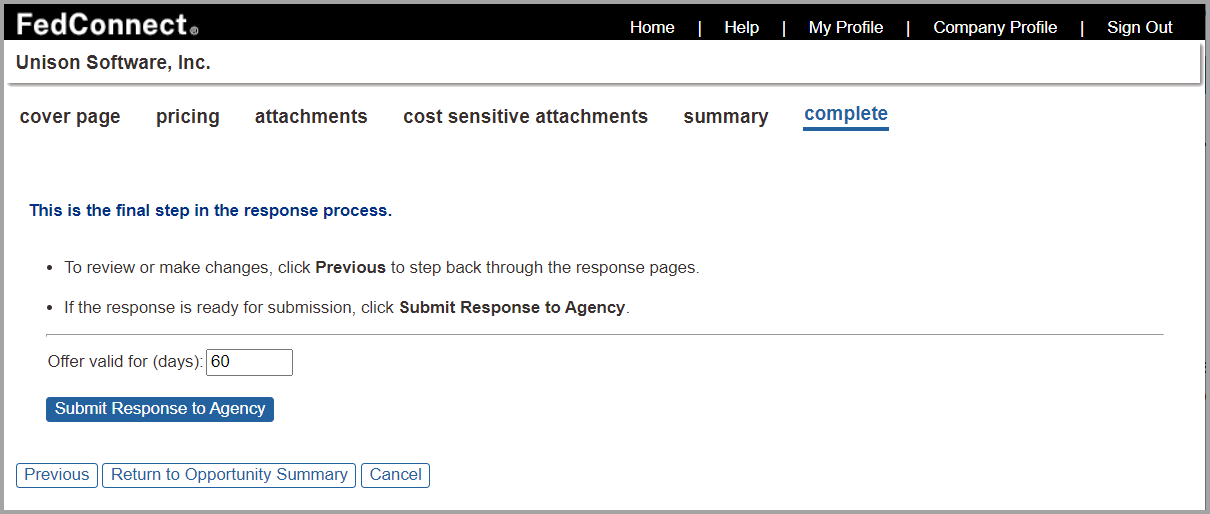
Once you have accessed the Complete page:
- In the Offer valid for (days) field, type the number of days that your response is valid.
- Click Submit Response to Agency. The Response Complete Confirmation page displays.
- On the Response Complete Confirmation page:
In the Confirmation Number field, your confirmation number that confirms that your response was submitted to the agency displays.
In the Sent field, the time and date that your response was submitted to the agency displays.
In the Status field, your response's current status displays.
In the Picked up by Agency field, the time and date that your response was actually received by the agency displays.
Click Print to print a copy of the Response Complete Confirmation page.
Click Return to Opportunity Summary to return to the Opportunity: [Title] page.
Congratulations! You just completed the process for responding to an opportunity!
The following picture illustrates the Confirmation page—note that the unique bid ID that FedConnect sends to its sister product PRISM is the number that displays in the Confirmation Number field. Your results will vary as each confirmation number is unique.
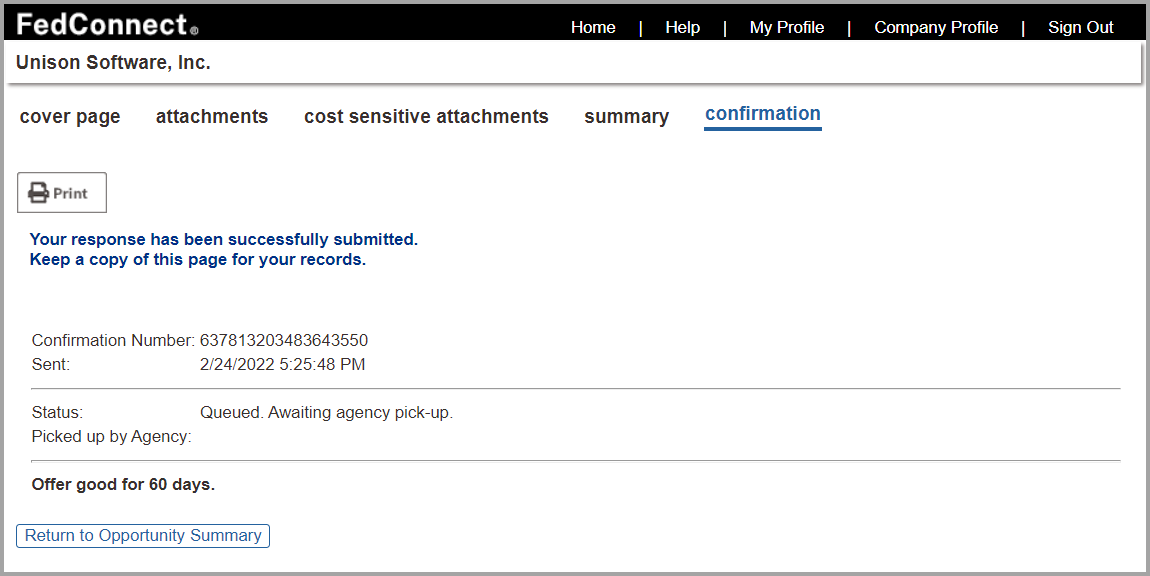
About the Unique FedConnect Bid ID
The data in the Confirmation Number field on the Confirmation page is the unique bid ID that FedConnect sends to its sister product, PRISM. PRISM is Unison's contract management system.